Friday, March 22, 2013

Origami Dresses

Playing with paper is fun and these dress were all made from squares of origami paper


they are easy to make and make lovely cards and invitations


I added pieces of lace, rhinestones, pearls, buttons & silk ribbon so that each dress is unique


and how could I work on any project with including a graphic from Karen's blog The Graphics Fairy
- for this card I chose a French theme because the dress is rather classic chic, don't you think?


getting married?


or"Ladies who Lunch"  - this was a custom order for place cards


There are lots of links to tutorials & videos to make these dresses -  here is the one I used

and...............for the man in your life I made this with a £20 note

and this was  a $20 note

the tutorial for folding dollar note is shirts right   here

Happy Paper Crafting

Gill

Thursday, March 14, 2013

Gift Wrapping

I have been having a busy time preparing for classes and one of the classes I enjoy most is gift wrapping. 

There are so many things you can do with paper, ribbon, tapes, jewels, lace and other bits and pieces that it is fairly easy to make something original and make yours a unique "Designer" wrap

These are a few of the wraps I have designed in the last week - I hope they inspire you

Pink metallic paper, velvet ribbon with hand made & dyed silk roses


Duck egg wallpaper with a satin ribbon Tiffany bow and vintage rhinestones from a damaged piece of vintage jewellery


for the man in your life - add a keyring as an extra little present (I used a leather boot keyring)


this would look great if you were giving a pair of Jimmy Choos!

lace & pearls on wallpaper


HAPPY WRAPPING & PLEASE LEAVE A COMMENT OR FOLLOW IF YOU LIKE MY PAGE

Gill

Friday, March 1, 2013

Easy to make fork bows tutorial


I am spending lots of time preparing for classes, but still manage to fit in time to try new things - you know what it's like. Something just grabs you and you must try it!

My latest "play" is covering journals with linen and giving them an individual look

I will shortly post a link on how to do this,  but today  thought I would just share how to make some teeny weeny little ribbons bows.


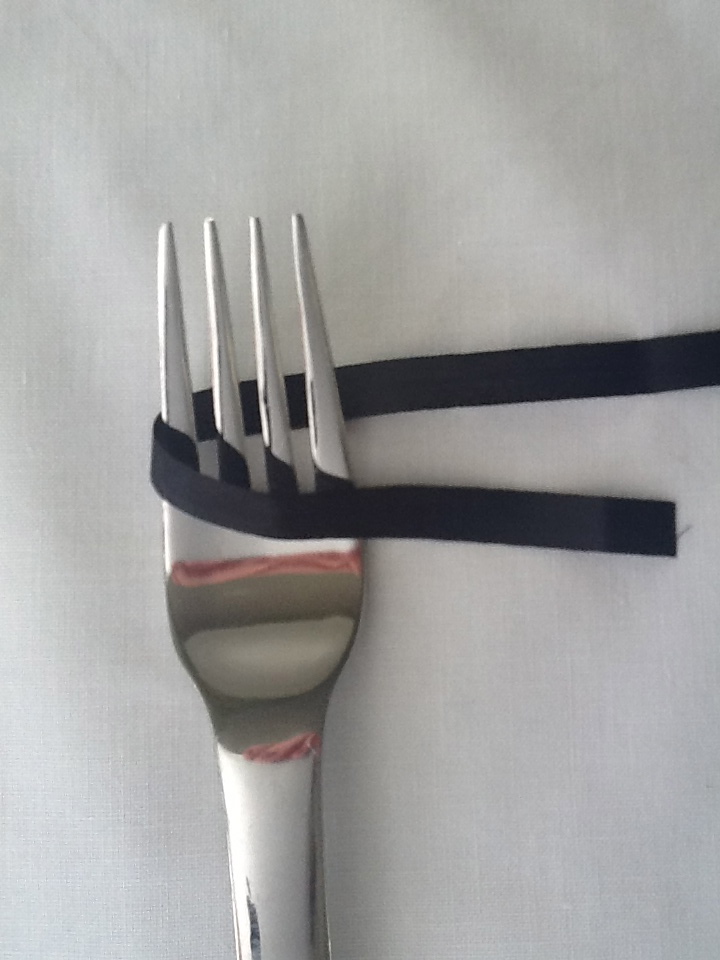
 These are modelled on a fork and take less than a minute to make!

Materials:
1 x fork
20 cms x 7mm wide  ribbon (I used100% silk)

 Fold the ribbon around the fork - the lower ribbon should be about 3 cms longer than the top one


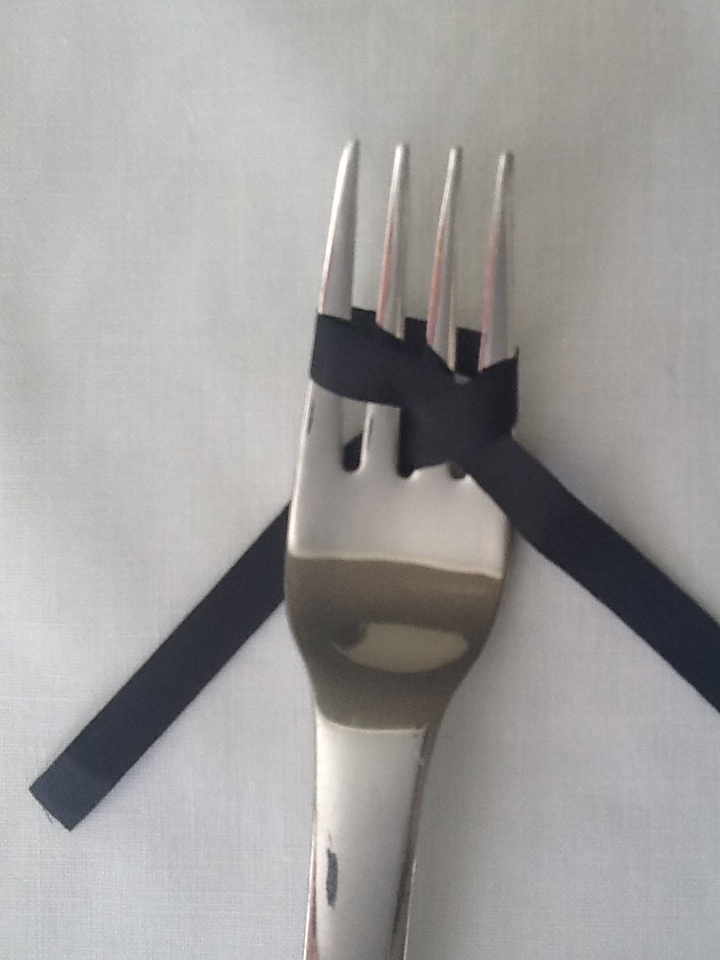
bring the bottom ribbon up and pass diagonally over the top ribbon and  through the centre tines


bring the other end around and over, & pass it down through the  centre tine in front of the other ribbon. The 2 ends will now be at the back of the the fork


turn the fork over and tie the two ends with a single bow (pull the ribbon as tight as you can)


 slide the loops from the fork

cut the ends diagonally and you have a neat little bow


I used  one of these cute bows on this linen covered journal, and added some vintage lace, tatting and mother-of-pearl buttons. I copied the beautiful silhouette from the Graphics Fairy - I now have a big stash of Karen's graphics that I want to use. 

The method I use to transfer the image was to copy the image on to Reynold's Freezer Paper and then burnish it on to the fabric with a spoon.


HAPPY CRAFTING

Gill


Sunday, February 24, 2013

Sea Shell Pendant Tutorial

I love to collect sea shells  - I am fascinated by all the beautiful shapes, colours and textures. On our recent trip to Portugal I collected some on Barril beach, Santa Lucia


I will be running a few sea glass pendant making workshops shortly 


........and thought the shells would add some interests if the students finish their projects early.

I soaked the shells in a 50/50 mix water and bleach overnight. Next morning I left them to air dry and then rubbed some baby oil on them, to enhance the colour and finish.

Next I wire wrapped them with 24 gauge jewellery wire and added a faux pearl to one. I think they are quite pretty and yet the only cost a few pence to make. They could be hung on voile ribbon or twine if you want a sun-kissed beach look lol

an inexpensive way to preserve the memory of happy day on the beach


see you soon......and, if you have enjoyed visiting today, please leave a message or follow by email

Friday, February 22, 2013

Tattlets and painting

I have no excuse for not posting for so long, except that we have been travelling in Europe in our motorhome.

I didn't do much crafting but here a few things I did to idle away some time

this card was  a trial in combining tatting and painting on a card ......the card was going to be white but I wasn't happy with the bottom part so I added a piece of black, painted it and voila... a monochrome card 


I really enjoy painting on black card as the colours seem to pop


iT is possible to buy special paint for painting on card but I find DecoArt Americana works really well so don't feel a need to buy more paints

I also made a few tatted items.......this little tattlet


and a pair of big earrings (I used the Stumpy bookmark pattern by Kersti Anear)


Happy crafting


Tuesday, December 4, 2012

Fabric Painting on Jeans

why is it that it is always your favourite things which get marks on them?

I couldn't believe it when I went to put on my newly laundered jeans and found a big mark on them - what it is or how it got there is anyone's guess!

My first reaction was that they would make a nice pair of holiday shorts but, seeing as we are on a winter holiday in Portugal, and it's quite cold, this wasn't a great idea.

I always bring paint with me when we travel; but because we are travelling in a motor home I can't bring all my paints (that would take a truck lol), but I do always bring some fabric paints.

I use So Soft Fabric Paint by Decoart  because it is by far the best wearing and soft-to-touch paint on the market. I also love the extensive colour range which you can see here  (63 colours!)

I  also use DecoArt brushes

Painting on fabric is just the same as on other surfaces, but I do dip the tip of the brushes in water (only the tip - you don't want to add too much water or the paint may bleed on the fabric. I always try a test piece on the inside of a garment before proceeding)  to minimize dragging on the fabric. 

This is my jeans look now and I do actually prefer them as I like to wear things that are different 


So Soft Fabric Paint can also be used on t-shirts


and cotton shirts (this one below has a removable brooch I made with hand dyed silk ribbon roses)


and this one has rhinestones


a little tip is that it is always advisable to wash garment prior to painting as this removes any starch used by the manufacturer (and best not to use fabric conditioner)

Happy fabric painting - expensive designer looks on a budget!

Sunday, November 18, 2012

Faux Vintage Perfume Box - a tutorial


Hi - I have been diagnosed....well self diagnosis and I am suffering from OCD (Obsessive Crafting Disorder).  This disorder is always with you! It can get you  in the middle of the night, whilst you are eating and, worst of all when you are doing housework! Suddenly you must stop whatever you are doing whilst this idea that will change mankind is in the forefront of your mind!  In my case OCD is hereditary and I can blame (thank actually) my mother, who was a soft furnisher. Even in the 50s and 60s she used to up-cycle furniture

I was recently given a lovely sample of  perfume and it came in a beautiful little box, which was too pretty to throw away


so I decided to give it a romantic looking aged effect and this is what I did:


I mixed instant coffee with hot water


and brushed it on the edges


then printed off 3 images from my favourite source The Graphics Fairy - 2 for the front and one inside


and  brushed the coffee over the images and allowed them to dry. I mixed some stronger coffee and flicked it over the images to give a more vintage look. I used a flat brush, but an old toothbrush works well


next I cut the images to fit the lid, inside and out,  and stuck them on with craft glue

then added a silk ribbon bow (which I dipped in the coffee and allowed to dry), added a vintage button and 2 little rhinestones at the edges of the script

Finally  I glued some vintage lace around the edge


and that's it - trash to treasure!

Sunday, October 28, 2012

Tatted bookmarks and felt hearts

sometimes I wish I wasn't so much of a flibbertigibbet - I really am a Gill of all trades and mistress of none! Why are we crafters like this I wonder?  I think that it's because, when we see something new to create,  our creative juices start flowing, and we just have to try it....like NOW! lol

Tonight I have been making a felt heart with silk ribbon roses and  decided to add a little dragonfly

for the tail I used used some lovely Kreinik metallic thread that my friend Kim, from across the pond, sent me (thanks again Kim). It is a beautiful thread with lots of sparkle. I dye the silk ribbon myself because this gives a lovely shaded effect.


Another craft I enjoy is tatting and I couldn't think what to do with  tatted bookmarks (except, of course, mark the place in a book). I tried to think of a novel way to present them as gifts and came up with this idea


I printed the image from The Graphics Fairy on to an A5 card and set up the boy & girl images so that one was printed on the back of the card, as an extra touch.


I gave the little girl's dress a watercolour wash and added a ribbon to match


The purple bookmark pattern is a Mary Konior pattern and the red & orange is "Stumpy" by Kersti Anear

I thought about adding some text, but actually like the simplicity of them as they are 

Tatt's it folks!

Wednesday, October 24, 2012

Painted lace

I love making lace..........crochet lace, tatted lace  and painted lace

I thought I would share my sheet of lace painting tips which I made up a few years ago. This is how to paint basic lace and, if you want to paint something, more intricate I would suggest looking at Arlene' Linton's site


It really is far easier than it looks to paint lace and all you need is a small flat brush, liner brush, stylus (or cocktail stick)  and water based acrylic paint. Painted lace is beautiful on all kinds of surfaces - if you are painting on plastic ie Christmas balls you can basecoat with DecoArt Multi Purpose sealer


To design a round piece of lace 
Place a round object (plaque, plate, saucer or similar) on to the project & draw around it with a soap (or watercolour) pencil – complete using the strokes* below
or
design a circular pattern (in segments)
Cut out a circle of paper and fold neatly as many times as required. Place on the surface and mark round the outer edge. Make small marks to indicate where each fold is and remove the folded paper. If an inner circle is required cut out a smaller circle, place inside the outer one and draw around with soap pencil.  You will now have equal sized segments to assist you in placing the strokes.

To design Square or oblong  project
Make 2 small marks on the outside edge of a coin with a permanent pen (the marks should define 1/3 & 2/3 sections of the coin). Place the 2 marks precisely on the middle of one edge of the square or rectangle you have already drawn and draw round the edge of the coin with the soap pencil. Continue drawing the shapes until you get close to a corner – now you may have to adjust the spacing to fit (or you may have a gap at the end) Repeat this on the 4 sides. Add the corner shapes by using the coin to suit the space. For more intricate lace a 2nd row of semicircles can be added (with each one resting on 2 circles below). You will now have a series of circles to indicate where the strokes are painted. Paint the lace using the following strokes as required. below.


Materials 
White acrylic paint - Plaid Folk Art or DecoArt Americana 
FloatingMedium or Brush’n’Blend
Flat & liner brushes. 
Stylus (or cocktail sticks) 

Paint a “C” stroke to create each circular shape around th.e edge with a  brush loaded with white on one corner and floating medium on the other


To paint a sheer effect for the base - mix a tiny drop of white with floating medium (or faux glazing medium) and brush over the surface (to create a faux finish effect at this stage you can use a dry brush or make  a pattern using a piece of net,  kitchen towel (I once used bubble wrap). The full effect will not show until the paint dries. 

Make dots using a stylus or cocktail stick. Make sure you have a good puddle of creamy paint.  If you practise you will notice that as you make the dots they get smaller each time which makes a nice graduated effect. If you want the dots a uniform size you should dip in to the paint puddle each time. To make the pattern symmetrical start on the middle of the outside edge o a C stroke and work down until you reach the start of the next stroke. . Then, reload the brush and start again - dot over the very first dot and work down the other side.  Always dip into the centre of the puddle.
To paint cute little hearts - dip the end if a liner brush into the paint puddle and make a dot on the project - repeat making a 2nd dot right next to the first one, then, using the end of the brush pull the paint down from each dot to make a 
heart shape
Lazy daisies use a liner brush and inky paint to paint little 5 petal lazy daisies (just like embroidery at school!) and make a dot in the middle for the French knot
Crisscross - use the liner with white paint. I find it easiest to go around the project making all the lines in one direction and repeat the other way to make the criss cross pattern. 
To paint a lace effect using a paper doily – basecoat the surface  using white or cream (or the colour you want the doily to be). Lightly spray repositionable adhesive on to the doily and place on the surface. Apply the colour you want as the background colour. I prefer to use a sponge dauber but you can also use a stencil brush or spray paint. Remove the doily and you are left with a negative pattern  of the doily (really effective)


I hope these little tips are useful…………enjoy