Showing posts with label tutorial. Show all posts

Friday, March 1, 2013

Easy to make fork bows tutorial


I am spending lots of time preparing for classes, but still manage to fit in time to try new things - you know what it's like. Something just grabs you and you must try it!

My latest "play" is covering journals with linen and giving them an individual look

I will shortly post a link on how to do this,  but today  thought I would just share how to make some teeny weeny little ribbons bows.


 These are modelled on a fork and take less than a minute to make!

Materials:
1 x fork
20 cms x 7mm wide  ribbon (I used100% silk)

 Fold the ribbon around the fork - the lower ribbon should be about 3 cms longer than the top one
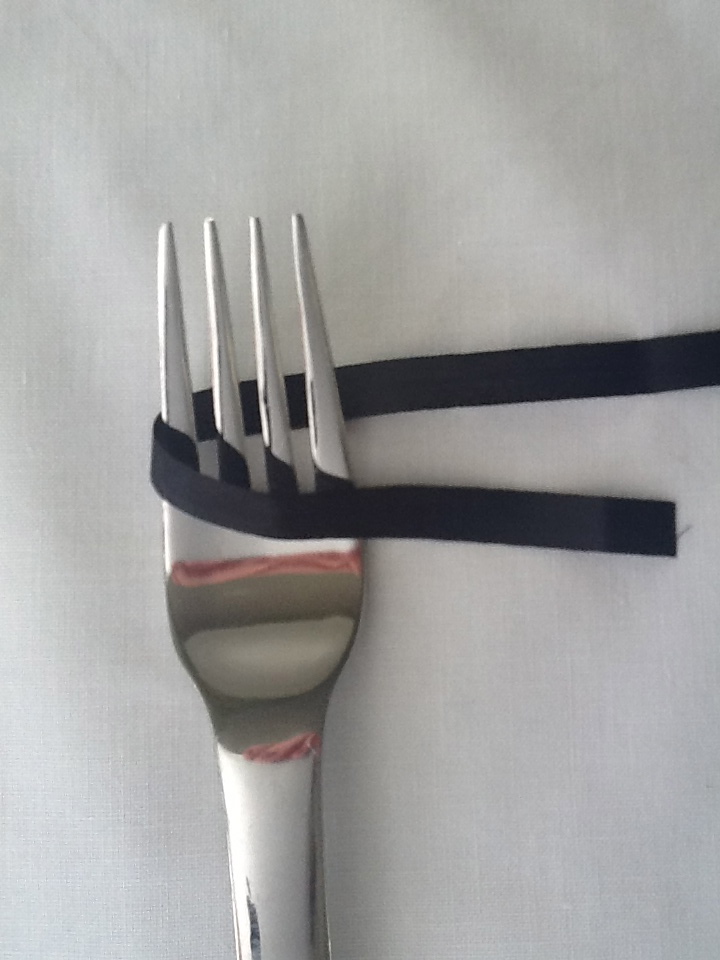


bring the bottom ribbon up and pass diagonally over the top ribbon and  through the centre tines
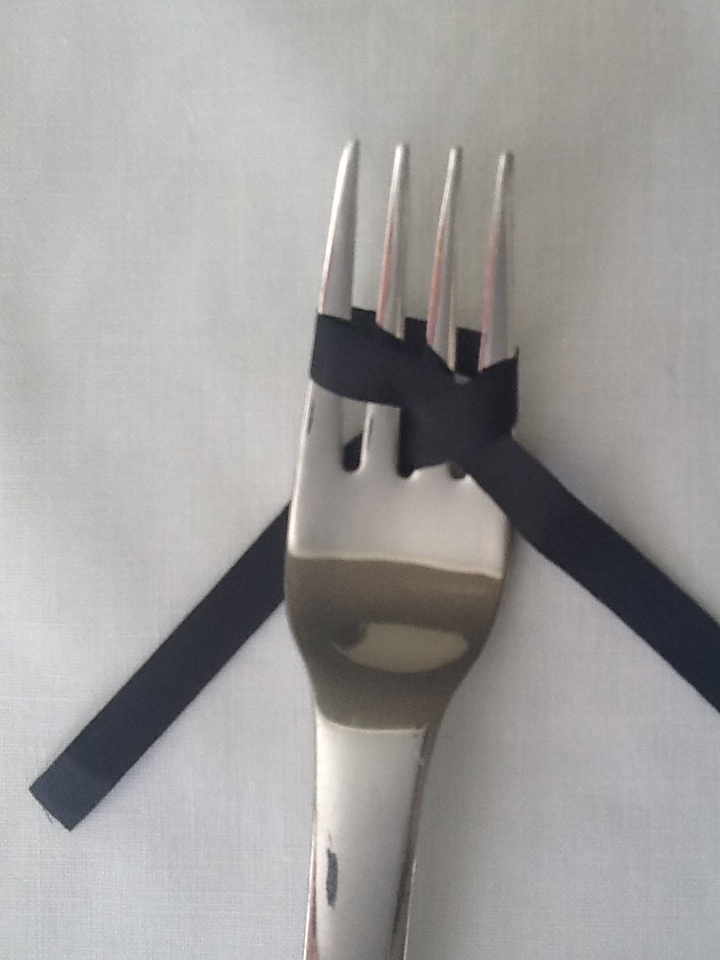


bring the other end around and over, & pass it down through the  centre tine in front of the other ribbon. The 2 ends will now be at the back of the the fork


turn the fork over and tie the two ends with a single bow (pull the ribbon as tight as you can)


 slide the loops from the fork

cut the ends diagonally and you have a neat little bow


I used  one of these cute bows on this linen covered journal, and added some vintage lace, tatting and mother-of-pearl buttons. I copied the beautiful silhouette from the Graphics Fairy - I now have a big stash of Karen's graphics that I want to use. 

The method I use to transfer the image was to copy the image on to Reynold's Freezer Paper and then burnish it on to the fabric with a spoon.


HAPPY CRAFTING

Gill


Sunday, February 24, 2013

Sea Shell Pendant Tutorial

I love to collect sea shells  - I am fascinated by all the beautiful shapes, colours and textures. On our recent trip to Portugal I collected some on Barril beach, Santa Lucia


I will be running a few sea glass pendant making workshops shortly 


........and thought the shells would add some interests if the students finish their projects early.

I soaked the shells in a 50/50 mix water and bleach overnight. Next morning I left them to air dry and then rubbed some baby oil on them, to enhance the colour and finish.

Next I wire wrapped them with 24 gauge jewellery wire and added a faux pearl to one. I think they are quite pretty and yet the only cost a few pence to make. They could be hung on voile ribbon or twine if you want a sun-kissed beach look lol

an inexpensive way to preserve the memory of happy day on the beach


see you soon......and, if you have enjoyed visiting today, please leave a message or follow by email

Sunday, November 18, 2012

Faux Vintage Perfume Box - a tutorial


Hi - I have been diagnosed....well self diagnosis and I am suffering from OCD (Obsessive Crafting Disorder).  This disorder is always with you! It can get you  in the middle of the night, whilst you are eating and, worst of all when you are doing housework! Suddenly you must stop whatever you are doing whilst this idea that will change mankind is in the forefront of your mind!  In my case OCD is hereditary and I can blame (thank actually) my mother, who was a soft furnisher. Even in the 50s and 60s she used to up-cycle furniture

I was recently given a lovely sample of  perfume and it came in a beautiful little box, which was too pretty to throw away


so I decided to give it a romantic looking aged effect and this is what I did:


I mixed instant coffee with hot water


and brushed it on the edges


then printed off 3 images from my favourite source The Graphics Fairy - 2 for the front and one inside


and  brushed the coffee over the images and allowed them to dry. I mixed some stronger coffee and flicked it over the images to give a more vintage look. I used a flat brush, but an old toothbrush works well


next I cut the images to fit the lid, inside and out,  and stuck them on with craft glue

then added a silk ribbon bow (which I dipped in the coffee and allowed to dry), added a vintage button and 2 little rhinestones at the edges of the script

Finally  I glued some vintage lace around the edge


and that's it - trash to treasure!

Monday, July 30, 2012

roses roses roses


 I love roses - I love the shapes, the fragrance and the colours. I love the poem by our bard, Rabbie Burns


O my Luve's like a red, red rose
That’s newly sprung in June;
O my Luve's like the melodie
That’s sweetly play'd in tune.

As fair art thou, my bonnie lass,
So deep in luve am I:
And I will luve thee still, my dear,
Till a’ the seas gang dry:

Till a’ the seas gang dry, my dear,
And the rocks melt wi’ the sun:
I will luve thee still, my dear,
While the sands o’ life shall run.

And fare thee well, my only Luve
And fare thee well, a while!
And I will come again, my Luve,
Tho’ it were ten thousand mile.


I have been painting roses for about 12 years and have enjoyed teaching  others. For some reason my passion for painting has faded away and I hardly ever pick up a brush although, I must admit, I still have about 250 brushes! the main reason is that I don't have a studio any more and this means I can't "slaister" about with paint as I make too much mess in the house!


There are, however, many other crafts involving roses 

I recently dried some roses my daughter gave me


There are lots of ways to dry roses including including using sand, desiccant, silica gel, microwave (got to be careful) and freeze drying. The method I use is more simple and has a good success rate

1)  strip all leaves from the stems
2)  cut the stems so that they are all different lengths to allow warm air to reach each individual one
3)  wind an elastic band around around the stems about 1" from the ends (as the stems dry they will   
      shrink and so will the elastic band) 
4)   hang in a warm airing cupboard  for 1-2 weeks until they feel "papery" to touch


I added the dried roses to a concrete head I have in the hall (I bought it from a garden centre, painted it and added a vintage  effect in the crevices).

The hydrangeas are from my garden and were dried by standing in about 1" of water for a couple of weeks.  The ones pictured are about 2 years old but I really do like a vintage faded look.They should be picked in Autumn after they have flowered and, interestingly enough, hydrangea flowers are actually the tiny centres which look like stamens rather than what looks like coloured petals.


Dried hydrangeas and roses


Also  I have now discovered the beauty of ribbon embroidery, thanks mainly to the beautiful book simply called "Roses" by Di van Niekerk.  Her work is breathtaking and the photos in the book are such a delight to look at.  Di had very clear videos on Youtube and tutorials on her website.

and so...........yet another craft. This time the house will be filled with coloured ribbon in silk, taffeta, linen and more. I have some beautiful French ombre (shaded) silk ribbon and have waited a long time to find a use for it and now I have


Today I hand painted a batch of white ribbon ......


I;m going to use the top one to sew hydrangeas and the other for variegated leaves.

There is so much to learn in ribbon embroidery but that is what, I think, makes a craft worthwhile.


anyway........thank goodness for crafts - the weather here in Scotland is what we call dreich, in other words dull, grey and wet.